Sunday, December 7, 2014

Breakfast Potatoes

Recipe Found Here

4 whole (to 5) Large Red Potatoes
1 whole Onion
1 Tablespoon Vegetable Or Canola Oil
1 Tablespoon butter (more if pan needs it)
Salt and Pepper, to taste
Red and Green Bell Peppers, Diced (optional)

Place potatoes in a large pot and cover entirely with water. Bring to a boil and cook until potatoes are fork tender (20 min or so). When they are ready, place the potatoes on a cutting board and dice them into 1-inch pieces.

Next cut up an onion into a large, rough dice.

In a large skillet heat oil and butter. Put the onions in the skillet and sauté until they start to turn brown. (You can also use red and green bell peppers diced up. If you do, throw them in at this point).

Next, throw in the diced potatoes. Stir well and then slightly press/pack then. Now you will cook them without stirring for several minutes. You want the pan to be hot enough to crisp the potatoes but not hot enough to char them. (Optional step: sprinkle a bit of flour over potatoes as they cook). Cook for several minutes and then flip them with a spatula. Salt and Pepper them as they cook. Cook until desired brownness.

tempering chocolate notes

Just temper the chocolate!

Foolproof method (they taught us this in school AFTER we mastered the hardcore old-school French methods):
-bring a pot of water to a boil
-turn it off, put the chocolate in a bowl over it, and ignore for about 10 minutes
-when all the chocolate is melted except the middle, remove from the heat and stir to melt the rest
-stirring vigorously is important, and by the time the chocolate reaches the holding temperature, there should still be a few unmelted pieces
-the holding temperature for dark chocolate is 86-90, for white or milk it's 83-86 (as in, it should stay in that range while using)
-you can test if it's tempered by smearing a bit on a cool surface...if it sets up quickly and without streaks, you're good. if not, stir some more and maybe rewarm, then bring the temp back down with some new pieces of unmelted chocolate.

another guide:

http://www.cookingforengineers.com/article/155/Tempering-Chocolate

Sunday, September 28, 2014

The Ultimate Cheesecake

 
Preheat the oven to 325 degrees F.

In a mixing bowl, combine the ingredients with a fork until evenly moistened. Lightly coat the bottom and sides of an 8-inch springform pan with non-stick cooking spray.

Pour the crumbs into the pan and, using the bottom of a measuring cup or the smooth bottom of a glass, press the crumbs down into the base and 1-inch up the sides. Refrigerate for 5 minutes.

For the Filling:

In the bowl of an electric mixer, beat the cream cheese on low speed for 1 minute until smooth and free of any lumps. Add the eggs, 1 at a time, and continue to beat slowly until combined. Gradually add sugar and beat until creamy, for 1 to 2 minutes.

Add sour cream, lemon zest, and vanilla. Periodically scrape down the sides of the bowl and the beaters. The batter should be well-mixed but not overbeaten. Pour the filling into the crust-lined pan and smooth the top with a spatula.

Set the cheesecake pan on a large piece of aluminum foil and fold up the sides around it. Place the cake pan in a large roasting pan. Pour boiling water into the roasting pan until the water is about halfway up the sides of the cheesecake pan; the foil will keep the water from seeping into the cheesecake. Bake for 45 minutes. The cheesecake should still jiggle (it will firm up after chilling), so be careful not to overcook. Let cool in pan for 30 minutes. Chill in the refrigerator, loosely covered, for at least 4 hours. Loosen the cheesecake from the sides of the pan by running a thin metal spatula around the inside rim. Unmold and transfer to a cake plate. Using a spatula spread a layer of Warm Lemon Blueberry topping over the surface.

Slice the cheesecake with a thin, non-serrated knife that has been dipped in hot water. Wipe dry after each cut.
Warm Lemon Blueberries:

In a small saucepan add all the ingredients and simmer over medium heat for 5 minutes or so until the fruit begins to break down slightly. Leave to cool before spreading on cheesecake.

Yield: 6 servings

Read more at: http://www.foodnetwork.com/recipes/tyler-florence/the-ultimate-cheesecake-recipe.html?oc=linkback

Thursday, May 29, 2014

Righteous Hash

Inspired by lunch at Sister's in Gainesville Florida


Hashed Potatoes
Onion
Scrambled Egg
Turkey Sausage
Tomato
Gruyère Cheese
Roasted Red Pepper Hollandaise Sauce


http://www.foodnetwork.com/recipes/guy-fieri/grilled-skirt-steak-hash-with-roasted-red-pepper-hollandaise.html

Saturday, April 26, 2014

***Hawaiian Chicken Kabobs***

Marinade:
1/2 cup soy sauce
1/2 cup pineapple juice
1/4 cup vegetable oil
1 Tablespoon brown sugar
1 teaspoon garlic powder
2 teaspoon fresh ginger
1 teaspoon dry mustard

3-5 chicken breasts (I used 3 fairly thick ones)
2 green peppers
2 onions
2 red peppers
1 container of cherry tomatoes
1 pineapple cored and cut into cubes
Wooden skewers
Seasoned salt and pepper to taste (I used Lowry's salt and a pepper grinder)


Combine all marinade ingredients in a saucepan. Bring to a boil. Reduce heat and simmer for 15 minutes. 

Cut off fat on raw chicken and cube. Place chicken in a 9×13 pan and pour marinade over top. Cover and put in refrigerator for at least 3-4 hours (or overnight). I turned the meat once to make sure both sides were well marinated.

Prep/cut all veggies up and place in another 9×13 and refrigerate until you are ready to “kabob”. I salt & peppered the peppers, onion, and tomato in the pan, but not the pineapple. Run water over wooden skewers so they do not catch fire on grill (I soaked mine for about 30min to help food slide on better and not splinter). Alternate chicken with veggies and pineapple. Heat grill to med-high heat and cover with grill foil (or regular foil with cooking spray). Grill covered approximately 6 minutes on both sides, until chicken is cooked through.

Recipe found here

Hamburger Gravy

(Louise H.)


1 lb. ground beef
3 cups milk
1/2 cup flour
mashed potatoes
Peas

Brown beef in pan until no longer pink. Mix flour in milk with a fork until smooth. Add liquid to the beef and bring to a boil until thickened. Serve over mashed potatoes and peas.   

Tuesday, April 8, 2014

Homemade Strawberry Ice Cream

Makes about fourteen 1/2 cup servings

3 cups fresh ripe strawberries, stemmed and sliced
4 Tablespoons freshly squeezed lemon juice
1 1/2 cups sugar, divided
1 1/2 cups whole milk
2 3/4 cups heavy cream
1 1/2 teaspoons pure vanilla extract


In a small bowl, combine the strawberries with the lemon juice and 1/2 cup of the sugar. Stir gently and allow the strawberries to macerate in the juices for 2 hours. Strain the berries, reserving juices. Mash or puree half the berries.(I would puree all the berries next time so it is a nice smooth ice cream, I didn't like small little frozen pieces of strawberries in the ice cream).

In a medium mixing bowl, use a hand mixer on low speed to combine the milk and remaining granulated sugar until the sugar is dissolved, about 1 to 2 minutes. Stir in the heavy cream, reserved strawberry juice, mashed strawberries and vanilla. Turn the machine on; pour the mixture into freezer bowl, and let mix in completely. The ice cream will have a soft, creamy texture. If a firmer consistency is desired, transfer the ice cream to an airtight container and place in freezer for about 2 hours. Remove from freezer about 15 minutes before serving.

***Key Lime Pie***

Recipe found here

1 1/4 Cups graham cracker crumbs
1/4 Cup sugar
5 Tablespoons butter, melted
2 14 oz. cans sweetened condensed milk
1/2 Cup sour cream
3/4 Cup key lime juice (may add more to taste, 2 oz) Make sure to strain the juice to remove pulp
Lime wedges for garnish (you can use zest, but it makes the whipped cream taste very sour)
Whipped cream for garnish
Crust
Combine crumbs, sugar and butter. Mix until blende. Press crumbs into bottom and sides of a 9 inch pie pan.
Pie
Combine sweetened condensed milk, sour cream, and key lime juice. Stir until smooth
Pour into pie pan. Bake for 10 minutes in 350 degree oven, until tiny bubbles form on the surface.
Turn off oven and let pie sit in oven for 30 minutes - do not allow to brown.
Chill before serving. Garnish with whipped cream and lime wedges

Wednesday, March 12, 2014

Southern Collard Greens

(Oma J.)

ham bone
collards
3 Tablespoons vinegar
4 teaspoons sugar
pinch salt

Clean them well - each leaf individually as they are sandy.  OR you can buy them in a bag chopped and cleaned.
Take a ham bone or part of the ham/bone. 
Take greens and pull the thick part of stem off.  Put all greens in pot with ham bone and just barely cover w/water;  add white vinegar, sugar, and a bit of salt.  Bring to boil;  simmer about an hour covered.  Taste to correct.  If bitter add a little more sugar - may need a bit more vinegar.

Wednesday, February 26, 2014

***THE Southern buttermilk biscuits***

Recipe combined from here and here and here

Makes about 10-12 biscuits


If using a Cast Iron pan: 425 degrees, 16-18 min

2 cups 
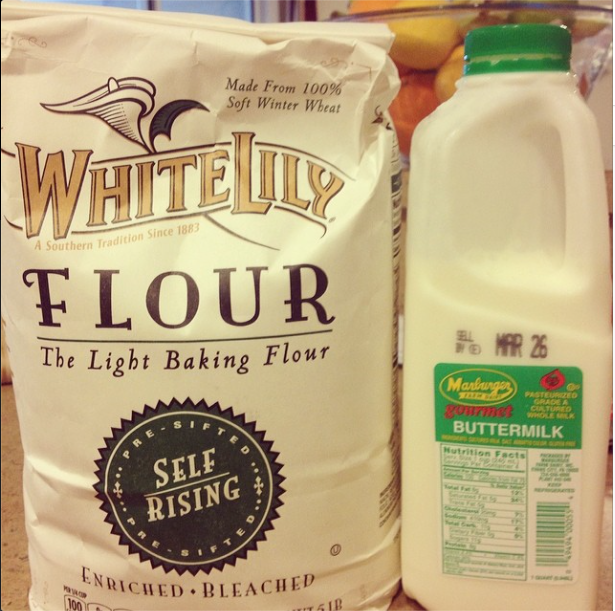
Self-Rising flour (White Lily preferred), plus more for dusting
4 Tablespoons cold butter, to cut in
1 Tablespoon un-salted butter, melted
1/4 cup cream cheese, cold (about 2 oz)
3/4 cup whole buttermilk  (If dough is dry may add a bit more, maybe 1-2 Tablespoons)
Maldon flaky salt*

Preheat the oven to 500°F for baking sheets.
425°F for cast iron pan 
Make sure the oven rack is in the middle position.

Measure the flour into a large bowl. Incorporate the cold butter and cream cheese into the flour, using a pastry blender or two knives. Cut butter into flour until it is crumbly.

Make a well in the center. Pour in the buttermilk and, using a fork to mix lightly, mix the flour into the buttermilk. The dough will be wet and messy.

Flour a work surface or a sheet of parchment paper works well too. Dump the dough from the bowl onto the surface.

Flour the top of the dough and the rolling pin. Roll out the dough to 1-inch thickness into an oval shape. Do not over handle the dough. Take the short sides of the oval and fold them in toward the middle, turn the dough, gently press down into a oval again and repeat. Repeat this folding once more and pat into desired thickness, usually about an inch or more. This folding creates flaky layers in the biscuits.

Use the biscuit cutter and start from the edge of the rolled-out dough and cut straight through the dough with the cutter, trying to maximize the number of biscuits cut from this first roll out. Roll out the excess dough after the biscuits are cut and cut more biscuits.

Place the biscuits on a baking sheet, or in a cast-iron skillet, or a baking pan with the biscuit sides touching. (It does not matter what size pan or skillet you use as long as the pan has a lip or sides and the biscuits are touching. 

Brush the tops with the melted butter. *Lightly sprinkle the biscuits with a few grains of flaky salt (such as Maldon). 

For extra flaky biscuits, chill the dough before baking until firm, about 10 minutes.

Place the pan in the oven and bake 10 to 12 minutes on a baking sheet, until light brown on top. 15-20 min for cast iron. Brush with butter again when you remove from the oven.


To Make Ahead: The unbaked biscuits can be frozen: Freeze biscuits in a single layer and transfer to a resealable plastic bag for up to one month. Bake straight from the freezer, adding a few minutes to the cooking time.

Note: You can freeze any leftover baked biscuits. To reheat, do not defrost. Wrap the biscuits in foil. Bake in a 400°F oven 25 to 30 minutes. Open the top of the foil for the last 3 to 5 minutes to brown a little on top.

White Lily Flour is (according to MANY websites) the preferred flour for Southern buttermilk biscuits. It is made from soft winter wheat and has a low protein count, so if you can fine a similar flour I'm sure it would work well too. Amazon sells White Lily. 


The Secrets to the Best Ever, Perfect Southern Buttermilk Biscuits

Secret #1 - Preheat the skillet. Just as you do with Southern cornbread, coat a cast iron skillet or with shortening, or butter or spray a rimmed baking sheet or cake pan with non-stick cooking spray. Preheat it in the oven just like with cornbread for about 5 minutes. (I didn't do this).

Secret #2 - Use very cold, self rising flour, and for the best biscuits, use a soft, winter wheat flour - like White Lily brand - and yes, it does make a difference! Just stick the flour in a bowl in the freezer the night before you plan to make biscuits. Do not substitute all purpose flour. (I just keep my self-rising flour in the fridge so it is cold).

Secret #3 - Use very cold fat from the refrigerator. It can be lard, vegetable shortening or pure butter, but my preference is butter. If using butter, cut the very cold butter half into cubes. Cut into the flour first using two knives or a pastry cutter until crumbly. When first learning to make biscuits avoid using your hands.

Secret #4 - Use buttermilk. Real buttermilk, not a vinegar and milk substitute. All good Southern biscuits contain real buttermilk. Period. If you don't tend to use buttermilk in your cooking, it will keep awhile, so just keep practicing on your biscuits with it and put some up in the freezer.

Secret #5 - Cold dough. Remember, a successful fluffy and light biscuit comes from keeping the dough cold and not handling it too much. The heat from your hands will melt the butter, so until you get to the point where you can literally mix and shape biscuits in about 5 minutes, use a gentle and soft touch because you do not want the dough to get warm!

Secret #6 - Folding. After quickly kneading, push the dough into a rectangle and fold the short sides in toward middle one on top of the other. Turn the dough, shape into a rectangle again and repeat. Repeat this folding once more for a total of three times and pat into desired thickness, usually about an inch or less. If you cut the biscuits too thick, they will quickly rise and lean over. The dough folding action creates flaky layers in the biscuits.

Secret #7 - No twisting! Use a cutter about 2 to 3 inches in size, cut them very close together and take care not to twist the biscuit cutter, whether it be a cutter or a juice glass, but only push down and lift up on the cutter. Twisting will cause the fibers in the edges of the biscuit to close and result in a flatter and more dense biscuit. So just press down and lift up - no twisting!!

Secret #8 - Spacing. I like to do my buttermilk biscuits in a skillet, which produces a crunchy crust on the bottom and soft edges. You may also bake them on a half sheet, rimmed baking pan or in a small greased cake pan. For biscuits that have more crunch all the way around, space them about an inch apart from each other. For soft biscuits, place them close together.

Secret #9 - High temperature. Bake your biscuits in a preheated 500 degrees F for 10 to 12 minutes or until golden brown and cooked through.

Saturday, February 8, 2014

Candied Pecans


2-3/4 cups pecan halves
2 tablespoons butter, softened, divided
1 cup sugar (I used white granulated)
1/2 cup water
1/2 teaspoon salt
1/2 teaspoon ground cinnamon
1 teaspoon vanilla extract


Place pecans in a shallow baking pan in a 250° oven for 10 minutes or until warmed. Grease a 15x10x1-in. baking pan with 1 tablespoon butter; set aside. 

Grease the sides of a large heavy saucepan with remaining butter; add sugar, water, salt and cinnamon. Cook and stir over low heat until sugar is dissolved. Cook and stir over medium heat until mixture comes to a boil. Cover and cook for 2 minutes to dissolve sugar crystals.

Cook, without stirring, until a candy thermometer reads 236° (soft-ball stage). Remove from the heat; add vanilla. Stir in warm pecans until evenly coated.

Spread onto prepared baking pan. Bake at 250° for 30 minutes, stirring every 10 minutes. Spread on a waxed paper-lined baking sheet to cool.


Recipe found here

Tuesday, January 7, 2014

Butternut Squash Soup

(K. Robinson)

1/2 onion, chopped
4 Tablespoons butter
6 cups peeled and cubed butternut squash
3 cups chicken broth
4 cubes chicken bouillon
1/2 teaspoon Basil
1 teaspoon Nutmeg
1/4 teaspoon Ground Black Pepper
1/8 teaspoon Ground Cayenne Pepper 

2 eight oz packages of cream cheese (I use 1 package first, then see how creamy it is before adding any of the second - it's really about preference.)

Directions: In large saucepan, saute onions in butter until translucent and tender. Add raw cubed squash, broth, bouillon, basil, nutmeg, black pepper, and cayenne pepper. Bring to a boil. Cook on med heat after it comes to a boil. Cook for 20 minutes, or until squash is tender.

Next, puree squash, broth and cream cheese together in a blender. *Personal Method --> It can get messy if you try to do it all at once, so I like to do this a cup or 2 at a time (1 or 2 cups broth, 1-2 cups cubed squash and a quarter to half of the 8 oz cream cheese package). Blend till smooth and then pour into large sauce pan or pot. Repeat process until all the squash, broth and cream cheese have been blended. If you think it needs to be creamier, I ladle more of the soup back into the blender and blend the 2nd package of cream cheese into it. Incorporate with the rest of the pot.

Re-heat soup, but do not allow to boil. Serve with warm rolls. Garnish with parsley (optional)