Showing posts with label Serve to Company. Show all posts

Saturday, January 28, 2023

Oven-Roasted Salmon

Recipe Found HERE


4 tablespoons (½ stick) butter 
4 tablespoons minced chervil, parsley or dill 
1 salmon fillet, 1½ to 2 pounds 
Salt and freshly ground black pepper to taste 
Lemon wedges 

Preheat the oven to 475 degrees. Place the butter and half the herb in a roasting pan just large enough to fit the salmon and place it in the oven. Heat about 5 minutes, until the butter melts and the herb begins to sizzle. 

Add the salmon to the pan, skin side up. Roast 4 minutes. Remove from the oven, then peel the skin off. (If the skin does not lift right off, cook 2 minutes longer.) Sprinkle with salt and pepper and turn the fillet over. Sprinkle with salt and pepper again. 

Roast 3 to 5 minutes more, depending on the thickness of the fillet and the degree of doneness you prefer. Cut into serving portions, spoon a little of the butter over each and garnish with the remaining herb. Serve with lemon wedges.

Monday, November 7, 2022

Perfect Pot Roast


1 whole (4 to 5 pounds) chuck roast 
2 tbsp. olive oil 
2 whole onions 
6 whole carrots (up to 8 carrots) 
Salt, to taste 
Pepper, to taste 
1 c. red wine (optional, you can use beef broth instead) 
2 c. to 3 cups beef stock 
3 sprigs fresh thyme, or more to taste 
3 sprigs fresh rosemary, or more to taste 

First and foremost, choose a nicely marbled piece of meat. This will enhance the flavor of your pot roast like nothing else. Generously salt and pepper your chuck roast. 

Preheat the oven to 275˚. Heat a large pot or Dutch oven over medium-high heat. Then add 2 to 3 tablespoons of olive oil (or you can do a butter/olive oil split). 

Cut two onions in half and cut 6 to 8 carrots into 2-inch slices (you can peel them, but you don’t have to). When the oil in the pot is very hot (but not smoking), add in the halved onions, browning them on one side and then the other. Remove the onions to a plate. 

Throw the carrots into the same very hot pan and toss them around a bit until slightly browned, about a minute or so. 

If needed, add a bit more olive oil to the very hot pan. Place the meat in the pan and sear it for about a minute on all sides until it is nice and brown all over. Remove the roast to a plate. 

With the burner still on high, use either red wine or beef broth (about 1 cup) to deglaze the pan, scraping the bottom with a whisk to get all of that wonderful flavor up. 

When the bottom of the pan is sufficiently deglazed, place the roast back into the pan and add enough beef stock to cover the meat halfway (about 2 to 3 cups). Add in the onion and the carrots, as well as 3 or 4 sprigs of fresh rosemary and about 3 sprigs of fresh thyme. 

Put the lid on, then roast in the oven for 3 hours (for a 3-pound roast). For a 4 to 5-pound roast, plan on 4 hours.


Tuesday, April 5, 2022

Loni's Blueberry Buckle

Loni P. 

Crumb Topping

1/2 cup (100g) granulated sugar
1/3 cup (67g) packed light brown sugar 
1 teaspoon ground cinnamon 
1/8 teaspoon freshly grated nutmeg 
1 1/3 cups (167g) unbleached all-purpose flour
8 Tablespoons (1 stick/113g) cold unsalted butter, cut into 1/2 inch (1.5cm) cubes

For the Buckle
1 1/4 cups (156g) unbleached all-purpose flour
1 teaspoon (4g) baking powder, preferably aluminum free
1/4 teaspoon (1g) baking soda
1/2 teaspoon fine sea salt 
1/4 teaspoon ground cardamom
6 Tablespoons (85g) unsalted butter, at room temperature
3/4 cup (150g) granulated sugar
2 large (100g) eggs, at room temperature
1 teaspoon pure vanilla extract 
1/2 teaspoon grated lemon zest 
2/3 (160g) cup sour cream 
2 cups (340g) fresh or frozen blueberries (thaw before folding into batter 
confectioner's sugar for dusting

Position a rack in the lower third of the oven and preheat the oven to 350 F (175 C). Butter the sides of a 9 inch round cake pan and line the bottom with parchment. 

To make the crumb topping: In a medium bowl, combine both sugars, the cinnamon, nutmeg, and flour and stir until well blended. Cut in the butter with a pastry blender until the crumbs are the size of peas. Transfer the topping to a covered container and set in the freezer to chill while you mix the cake batter. 

To make the buckle: Sift together the flour, baking powder, baking soda, salt, and cardamom into a medium bowl. Set aside. 

In the bowl of a stand mixer fitted with the paddle attachment (or in a large mixing bowl, using a handheld mixer), cream the butter and granulated sugar together on high speed for 5 to 7 minutes, until light and fluffy. Reduce the speed to low and add the eggs one (50g) at a time, mixing well after each addition; scrape down the sides and bottom of the bowl with a rubber spatula as necessary. Mix in the vanilla, lemon zest, and sour cream.

With the mixer still on low speed, add the dry ingredients, mixing until just incorporated. Remove the bowl from the mixer stand (if using) and gently fold in the blueberries. 

Scrape the batter into the prepared pan and spread evenly with a spatula. sprinkle the crumb topping evenly over the top. Bake for 40 to 50 minutes until the top is golden brown and firm to the touch. 

Serve warm or at room temperature, right out of the baking dish. Sprinkle the top of the buckle lightly with confectioner's sugar just before serving. 

The buckle can be stored tightly covered, in the refrigerator for up to 3 days. 

Sunday, December 26, 2021

Roast Whole Beef Tenderloin

PREP TIME FOR ROOM TEMP

Recipe combined from HERE and HERE

A larger roast size will take about 45 min or more to roast. I have made it with and without butter, both are fantastic. 

1 (2-5 lb) center-cut whole beef tenderloin roast 
Lawry's Seasoned Salt 
Lemon Pepper 
Kosher salt 
Freshly ground black pepper
2 Tablespoons vegetable oil 
1/4 cup beef broth (for gravy) 
butter


ROAST

Let the beef stand at room temperature for 1-2 hours before roasting. Set an oven rack in the lower middle position and preheat the oven to 400°F. 

Sprinkle the meat generously with Lawry's Seasoned Salt. You can much more liberally season a tenderloin, because you're having to pack more of a punch in order for the seasoning to make an impact. Start with Lawry's Seasoned Salt. Rub it in with your fingers. Sprinkle both sides generously with lemon pepper seasoning and then the pepper. (There are no measurements because it depends on your taste, but be sure to season liberally. 

Heat the oil in a heavy oven-proof skillet over medium-high heat until almost smoking. Cook, turning with tongs, until well browned on all but one side, about 10 minutes total. 

OPTIONAL: Throw a couple Tablespoons of butter into the skillet to give it a nice little butter injection before going in the oven. 

Turn the tenderloin so that the un-seared side is down, and transfer the skillet directly to the preheated oven. (If your pan isn't oven-proof, transfer the beef to a lightly oiled roasting pan). Place meat directly on roasting pan or use a rack needed. 

OPTIONAL: Put several Tablespoons of butter all over the meat before placing in the oven. 

Add a little water to the bottom of pan to help from burning the drippings. 


Roast until a thermometer inserted into the center of the meat registers 120°F-125° for medium rare (meat in photo is perfectly done at 125°), about 15 minutes, or until done to your liking (115°F-120°F for rare, 130°F-135°F for medium). Keep in mind that these temperatures account for the fact that the temperature will continue to rise about 5 degrees while the meat rests. 

I love an oven proof thermometer with an alarm. Just set the meat temperature you want and the alarm sounds when the meat is done and you don't have to keep manually checking the meat opening and closing the oven and losing heat. 
Transfer the meat to a carving board (preferably with a grooved well for collecting juices) and let it rest, covered loosely with aluminum foil, for 15 minutes. Place a dishtowel or oven mitt over the handle of the roasting pan to remind yourself that it's hot. 

You can deglaze the pan with about 1/4 cup of water or broth over medium heat on the stovetop. Pour drippings through a mesh strainer to keep smooth. Reserve the drippings for the gravy.

Carve the tenderloin thinly into 1/3-inch-thick slices. Serve the beef with gravy or you can spoon the olive oil/butter juices from the skillet on top of the meat for a little extra flavor.


GRAVY

4 cups of beef broth (use powdered bouillon)
8 Tablespoons flour
8 Tablespoons unsalted butter

Melt butter in pan. Add flour and whisk until light golden blonde (about 4 minutes), whisking constantly. Slowly add 4 cups of beef broth and whisk until thickened. Pour in drippings from roasting pan, stir. Add salt and pepper to taste. 

If it tastes too weak add 1 Tablespoon at a time of powdered beef bouillon. 

Saturday, May 2, 2020

Chipotle Chicken Quesadillas

The chicken mixture can be made up to 2 days ahead, cooled, covered, and refrigerated.

Recipe Found HERE


3 Tablespoons olive oil
1 large red onion, chopped (about 1-1/2 cups)
4 garlic cloves, minced
1/3 cup minced chipotle peppers in adobo sauce (you'll need about 6 chilis)
4 vine-ripened tomatoes (about 1-1/4 pounds), seeded and diced
3 scallions, thinly sliced
2 Tablespoons honey
2-1/2 cups cooked shredded chicken (white and/or dark rotisserie meat)
1 teaspoon salt
1/2 cup chopped cilantro
6 10-inch diameter flour tortillas
4 cups shredded sharp cheddar cheese
Sour cream, for serving (optional)
Lime wedges, for serving (optional)

INSTRUCTIONS
In a large sauté pan, heat the olive oil over medium heat. Add the onion and sauté until soft, about 5 minutes. Add the garlic and cook 1 minute more. Stir in the chipotle peppers and tomatoes. Cook until most of the liquid from the tomatoes has evaporated and the mixture is thickened, stirring often, about 20 minutes.

Stir in the scallions, honey, chicken, salt and cilantro. Keep warm.

Heat a sauté pan/griddle over medium heat and spray lightly with nonstick cooking spray. Lay a tortilla in the pan and heat until hot to the touch but not crisp (air pockets may form). Flip the tortilla over, then sprinkle 2/3 cup of the cheese evenly overtop, being careful to keep it off the pan.

Spread a generous 1/2 cup of the chicken mixture over half of the tortilla. When the cheese is mostly melted, fold the tortilla over to cover the filling and form a half-moon shape. Cook until the tortilla is crisp and golden and the cheese is melted, adjusting the heat as necessary, a few minutes per side. Repeat with the remaining tortillas.

Let the quesadillas rest a few minutes to allow the filling to set, then cut into wedges. Serve with sour cream and lime wedges, if desired.

Note: If you have a large griddle, use that to make the quesadillas so you can make a few at a time. Also, be sure to serve your quesadillas hot of the pan (or off the griddle), otherwise, they’ll get soggy and the cheese will harden. If this does happen, you can pop them in a 350 F degree oven to heat them up, but they won’t be as crisp and gooey as they are fresh.

Monday, January 13, 2020

New York Style Pizza Dough

PREP TIME FOR DOUGH TO RISE

Recipe Found HERE 

Article about how this recipe compares to others 

"This recipe, adapted from Roberta’s, the pizza and hipster haute-cuisine utopia in Bushwick, Brooklyn, provides a delicate, extraordinarily flavorful dough that will last in the refrigerator for up to a week. It rewards close attention to weight rather than volume in the matter of the ingredients, and asks for a mixture of finely ground Italian pizza flour (designated “00” on the bags and available in some supermarkets, many specialty groceries and always online) and regular all-purpose flour. As ever with breads, rise time will depend on the temperature and humidity of your kitchen and refrigerator."


153 grams 00 flour (1 cup plus 1 tablespoon)
153 grams all-purpose flour (1 cup plus 1 tablespoon and 2 teaspoons)
8 grams fine sea salt (1 teaspoon)

200 grams lukewarm water (a little less than 1 cup)
2 grams active dry yeast (3/4 teaspoon)
4 grams extra-virgin olive oil (1 teaspoon)

Food Scale
parchment paper
Semolina flour
1 15 oz jar pizza sauce (I prefer Le Roselli's, Amazon sometimes has it)
16 oz block whole-milk, low-moisture mozzarella (Polly-O recommended), will cover 3 pizzas
Desired Toppings

DOUGH
In a large mixing bowl, combine flours and salt.

In a small mixing bowl, stir together 200 grams (a little less than 1 cup) lukewarm tap water, the yeast and the olive oil, then pour it into flour mixture. Knead with your hands until well combined, approximately 3 minutes, then let the mixture rest for 15 minutes.

Knead rested dough for 3 minutes. Cut into 2 equal pieces and shape each into a ball. Place on a heavily floured surface, cover with dampened cloth, and let rest and rise for 3 to 4 hours at room temperature or for 8 to 24 hours in the refrigerator. (If you refrigerate the dough, remove it 30 to 45 minutes before you begin to shape it for pizza.)

MAKE THE PIZZA
Place each dough ball on a lightly floured surface/parchment (use the semolina flour for this) and use your fingers to stretch it, then your hands/fists to shape it into 10-12 inch rounds.

I bake it on a pizza steel 

Put the stone/pizza steel in the oven and preheat it on 500-550 degrees (your highest setting). I use my true convection bake/convection bake setting. Let the stone/pizza steel sit in the oven for at least 45-60 minutes BEFORE baking the pizza.

Top and transfer the assembled pizza onto the pizza stone (use a pizza peel or you can use a cookie sheet to do this). If you have the pizza lightly floured it should move back and forth easily on the peel or you can bake it with the parchment paper still underneath, if it's easier to just slide it all in on top of the pizza stone. Bake the pizza at 525 degrees for 5-7 minutes, watch not to burn. 

I have started putting the crust in for 2 minutes, then removing to put sauce/toppings, then back in oven for 3-4 minutes. 

We do 4-6 pizzas and as the door keeps opening the oven loses heat. Baking the crust first ensures a crispy crust on bottom without over baking the cheese. 

You can also GRILL THE PIZZA. Place the pizza stone on the grill and heat the grill to the highest temperature. This worked great and took about 4-5 minutes to baked each pizza. I put the pizzas in ready to go, no pre-baking the crust before adding toppings. 


Lisa's Favorite Toppings:
Green olives
red onion
roasted red peppers 
Fresh diced garlic
Fresh tomatoes

These pizza's were grilled outside on a gas grill. 


Wednesday, August 26, 2015

Grilled Hawaiian Chicken Teriyaki Bowls

PREP TIME TO MARINATE

Recipe found HERE
I recommend tripling the sauce to ensure enough for marinade, plus setting aside a portion to serve with food. 


4 or 5 boneless skinless chicken breasts cuts into tenders
2 zucchini, peeled and sliced thinly
1 bag of mini sweet bell peppers (or regular size sliced in thick strips)
1 pineapple, peeled and cut into spears (or big circles, core after grilling, easier to grill)
1 small red onion, sliced thin

Coconut Rice (you can make plain white rice also, the teriyaki flavor is very dominant) I cook my rice in a rice cooker with all the added ingredients and it worked great.

2 cups water
1 1/2 cups canned unsweetened coconut milk (about one 13.5 oz can)
2 teaspoons packed light brown sugar
1 teaspoon salt
2 cups white or jasmine rice

Teriyaki Sauce (if short on time, a bottled sauce would work)

1/2 cup soy sauce (I recommend low sodium)
2 Tablespoons rice vinegar
1 teaspoon sesame oil (original recipes calls for more, but I don't like sesame oil that much)
1/4 cup + 1 Tablespoon brown sugar
1 Tablespoon honey
3/4 teaspoon ground ginger (I used dry)
1 clove garlic, minced
2 teaspoons cornstarch + 2 teaspoons water, mixed together
1/4 teaspoon crushed red pepper

Coconut Rice
Make the coconut rice by adding the water, coconut milk, sugar, and salt to a large saucepan. Bring to a boil, then stir in rice. Return to a boil. Reduce heat to low, cover and cook for 20 minutes. Remove from heat and let stand 10 minutes, before fluffing with a fork. Or combine all in rice cooker.

Teriyaki Sauce
Add all of the sauce ingredients to a small saucepan over medium heat. Bring to a boil, stirring constantly, and boil for about 1 minute. The sauce should be thick enough to coat the back of the spoon. Pour 1/4 cup of the teriyaki sauce over the raw chicken and set aside the to marinate for at least 15 minutes to overnight. Reserve the rest of the sauce to serve with the meal when ready to serve. 

Prepare your grill and heat it to medium. If you have a vegetable grill basket to grill the vegetables in, then chop them and grill them in the basket. If not, cut the zucchini and onion into large chunks and leave the mini bell peppers whole. Drizzle some olive oil over the vegetables and over the pineapple spears. Grill the vegetables for just a few minutes on each side and then remove to a plate.

Grill the pineapple next by placing the pineapple spears directly on the grill. Grill for about 2 minutes on each side, and remove to a plate.

Lastly, place the chicken on the grill. Cook for about 2-5 minutes on each side, or until cooked through. Remove to a plate to rest before slicing.

To serve, add coconut rice to each serving bowl. Top with grilled veggies, pineapple and chicken. Drizzle a little of the remaining teriyaki sauce on top.

Saturday, April 26, 2014

***Hawaiian Chicken Kabobs***

Marinade:
1/2 cup soy sauce
1/2 cup pineapple juice
1/4 cup vegetable oil
1 Tablespoon brown sugar
1 teaspoon garlic powder
2 teaspoon fresh ginger
1 teaspoon dry mustard

3-5 chicken breasts (I used 3 fairly thick ones)
2 green peppers
2 onions
2 red peppers
1 container of cherry tomatoes
1 pineapple cored and cut into cubes
Wooden skewers
Seasoned salt and pepper to taste (I used Lowry's salt and a pepper grinder)


Combine all marinade ingredients in a saucepan. Bring to a boil. Reduce heat and simmer for 15 minutes. 

Cut off fat on raw chicken and cube. Place chicken in a 9×13 pan and pour marinade over top. Cover and put in refrigerator for at least 3-4 hours (or overnight). I turned the meat once to make sure both sides were well marinated.

Prep/cut all veggies up and place in another 9×13 and refrigerate until you are ready to “kabob”. I salt & peppered the peppers, onion, and tomato in the pan, but not the pineapple. Run water over wooden skewers so they do not catch fire on grill (I soaked mine for about 30min to help food slide on better and not splinter). Alternate chicken with veggies and pineapple. Heat grill to med-high heat and cover with grill foil (or regular foil with cooking spray). Grill covered approximately 6 minutes on both sides, until chicken is cooked through.

Recipe found here

Tuesday, August 6, 2013

White Cheese & Chicken Lasagna

So rich you only have it once a year!

recipe found here

  • 9 whole Lasagna Noodles (not Oven-ready)
  • ½ cups Butter
  • 1 whole Onion, Chopped
  • 1 clove Garlic, Minced
  • ½ cups All-purpose Flour
  • 1 teaspoon Salt
  • 2 cups Chicken Broth
  • 1-½ cup Milk
  • 4 cups Shredded Mozzarella Cheese, Divided
  • 1 cup Grated Parmesan Cheese, Divided, Plus Additional 1/4 Cup For Topping (optional)
  • 1 teaspoon Each, Dried Basil And Oregano
  • ½ teaspoons Ground Pepper
  • 2 cups Ricotta Cheese
  • 2 cups Cooked, Cubed Chicken
  • 1 package (10 Oz. Size) Frozen Chopped Spinach, Thawed And Drained
  • 1 Tablespoon Chopped Fresh Parsley


  • Preheat oven to 350ºF. Bring a large pot of lightly salted water to a boil. Cook lasagna noodles in boiling water for 8-10 minutes. Drain and rinse with cold water.

    Meanwhile, melt the butter in a large saucepan over medium heat. Cook the onion and garlic in the butter until tender, stirring frequently. Stir in flour and salt; simmer until bubbly.

    Mix in the broth and milk, and boil, stirring constantly, for 1 minute. Stir in 2 cups of mozzarella cheese and 1/2 cup Parmesan. Season with basil, oregano and ground black pepper. Remove from heat and set aside.

    Spread 1/3 of the sauce mixture on the bottom of the 9×13 inch baking dish. Layer with 1/3 of the noodles, and all of the ricotta and the chicken. Arrange 1/3 of the noodles over the chicken and layer with 1/4 of the sauce mixture, the spinach, and the remaining 2 cups of mozzarella cheese and 1/2 cup Parmesan cheese.

    Arrange remaining noodles over cheese and spread remaining sauce evenly over noodles. Sprinkle with parsley and additional 1/4 cup Parmesan cheese (optional).
    Bake for 35 to 40 minutes in the preheated oven. Let stand 5 minutes before cutting and serving.
    Enjoy!

    Sunday, March 18, 2012

    ***Cheesy Chicken and Wild Rice***

    recipe found here - adapted

    start to finish: 1 hour
     

    3 Tablespoons extra virgin olive oil
    1 medium onion, finely diced
    3 stalks celery, finely diced
    3 carrots, peeled and diced
    2 Tablespoons fresh minced garlic
    2 Cups shredded, cooked chicken breast
    2 Cups steamed white or brown rice, prepared - or more if you want more servings, 4 cups at the most
    16 oz prepared wild rice (I use two 4.2oz boxes of rice-a-roni)
    1 teaspoon kosher salt
    1/2 teaspoon black pepper
    1/4 teaspoon garlic salt
    ______
    Cheese Sauce
    4 Tablespoons butter
    1/4 Cup all purpose flour
    1/4 teaspoon kosher salt
    1/4 teaspoon black pepper
    2 Cups chicken broth
    2 Cups shredded cheddar cheese

    1. Heat oil in a large saucepan over medium heat. Saute onion, celery and carrots until softened, about 10 minutes. Stir in garlic and cook for 1 minute. Stir in chicken, both rices, salt, pepper and garlic salt. Reduce heat to low.

    2. To prepare cheese sauce melt butter into a medium saucepan over medium high heat. Whisk in flour, salt and pepper then slowly pour in chicken broth whisking continuously. Whisk until thick and nearly boiling then stir in cheese until melted. Pour cheese sauce into rice mixture and stir. Serve! Salt & pepper to taste if needed.


    Wednesday, November 30, 2011

    ***Delicious Dinner Rolls***

    Recipe found here

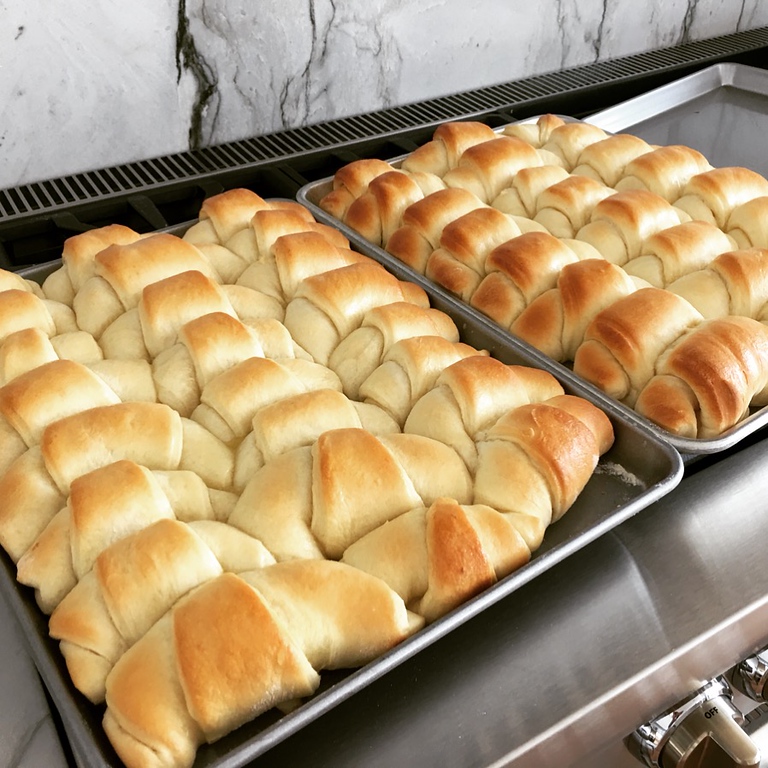
    Using jellyroll pans give the rolls a great shape. Adding dough enhancer will keep these rolls fresh for up to 6 days stored at room temp in Tupperware or zip-lock bag. You will get exactly 4 dozen rolls every time!


    In a large microwave safe bowl:
    1 1/2 cups of milk (I prefer to use 1% or higher fat)
    3/4 cup granulated sugar
    1 stick of butter (1/2 cup)

    In a 2 cup or larger sized liquid measuring cup:
    1 Tablespoon sugar
    2 Tablespoons active dry yeast
    2 cups of warm water (100-110 degrees)

    In KitchenAid Mixing Bowl:
    9-10 cups of flour (I use King Arthur All-Purpose flour or Turkey bread flour from Costco).
    3 Tablespoons, plus 1 teaspoon of store bought dough enhancer/conditioner (pictured below), helps preserve bread
    1 egg, beaten
    1 Tablespoon salt

    2 sticks of butter for buttering the pans and baked rolls
    Parchment paper


    .................................................................................................................................
    To Keep Bread/Rolls fresher for longer:
    2 teaspoons of dough conditioner/enhancer (if using homemade version)
    plus
    2 Tablespoons gluten


    Homemade dough conditioner:


    ¾ cup lecithin 

    3 Tablespoons ascorbic acid
    2 Tablespoons ginger
    3 Tablespoons cornstarch

    Store in air tight container at room temperature.


    OR

    2 Tablespoons from the can (it already contains gluten so you don't have to add that to it), if using the store bought (pictured below).

    .................................................................................................................................

    Scald milk, 3/4 cup sugar, and 1/2 cup butter in a microwave safe bowl, for about 4-5 minutes (or until butter is mostly melted).

    In the KitchenAid mixer with dough hook attachment, add 4 cups of flour, salt, dough enhancer, and egg. Mix a few times with spatula to combine.

    Meanwhile, in a measuring cup with 2 cups of warm water add 1 Tablespoon sugar, then 2 Tablespoons of yeast, mix slightly. Let it sit for a couple of minutes until it is bubbles up (proofed).

    Now add the scaled milk, sugar, and butter to the KitchenAid mixer with the flour mixture. We are going to add yeast to this hot mixture, but it will be too hot to just dump the yeast mixture yet. To cool it down stir in 2 more cups of flour.


    Keep track of how much flour you are adding!!!


    Now add the yeast mixture, after it has proofed.

    Gradually stir in remaining 9-10 cups of flour (counting the flour you have already added to cool it earlier, 3-4 cups of flour are left to be added). I would recommend adding 1 cup at time and stirring in between. You can mix these by hand in a large bowl or with a mixer. You will have to knead it by hand at the end.

    I lay out parchment paper and knead the last cup or two of flour by hand.

    At the end the dough will be dense and sticky, and may be hard to stir, you can use your hands to incorporate the rest of the flour if needed. Be sure not to add too much flour. You want to get it so it is no longer sticky, but you don't want to crumbly and falling apart from adding too much flour.

    Then smooth the dough out and cover the bowl with plastic wrap (spray a little pam on the plastic wrap or sprinkle some flour on top of dough, so it doesn't stick). Leave it in a warm place and let it rise (about an hour). Let the dough rise until it has doubled in size.

    When your dough is close to rising completely, butter 2 cookie sheets and set them aside.

    AFTER THE DOUGH RISES 

    Lay out parchment paper and lightly cover it with flour to prevent the dough from sticking. Dump your dough out and divide it into 4 balls. Eyeball the sizes, then lift them up and feel the weight of each ball. Try to make them even, but they don’t have to be perfect.

    Using one ball of dough at a time: roll the dough into a circle on a floured counter. Once it is rolled out spread the top with butter from edge to edge. You will use about 2 Tablespoons per circle of dough.Cut the dough into quarters using a pizza cutter. Then cut each quarter into 3 pieces. You should end up with 12 triangles from each circle of dough.

    You will roll the dough starting with the wide end of the triangle.Tuck the tail of the triangle under the roll and place it on the buttered cookie sheet. You will make 3 rows, with 8 rolls per row. This will give you 24 rolls per pan. Two balls of dough will fill 1 pan. You will get a total of 48 rolls!

    Pre-heat your oven to 350 degrees. Place the pans of rolls in a warm place to let them rise, I cover them with a lightweight towel. They will need about 45-60 min to rise again.

    AFTER THE 2ND TIME RISING 

    Once they are full in size, bake (one pan at a time) in the oven until they are golden brown. About 10 – 20 minutes, It may take more or less time depending on how fast your oven cooks. Keep a close eye on your first pan to get the right time for the second.

    While they are still hot out of the oven, brush with\ melted butter for a delicious buttery glaze.


    Saturday, September 24, 2011

    ***Towering Praline Carrot Cake***

    Kirsten R.

    I have baked this cake with the raw shredded carrots and the boiled version, they taste the same to me. The recipe calls for boiling the carrots first, but if you are low on time you can skip it and have a fantastic cake. 


    Cake:
    l lb or about 6 medium carrots (3 cups sliced)
    3 cups flour
    2 3/4 cups sugar
    2 teaspoon cinnamon
    1 1/2 teaspoon baking powder
    1 1/2 teaspoon baking soda
    1 teaspoon salt
    1 1/3 cups vegetable oil
    6 eggs, slightly beaten
    8 oz. can crushed pineapple, drained
    1 Tablespoon vanilla
    1 cup chopped pecans (optional, or add to outside of cake as decoration)
    1/2 cup flaked coconut


    Praline Sauce
    6 Tablespoons butter
    6 Tablespoons brown sugar
    4 Tablespoons whipping cream
    2 teaspoons vanilla

    Candied Pecan Halves (optional topping) 
    1/4 cup packed brown sugar
    1 Tablespoons orange juice (I replace this with butter and do it with brown sugar and butter - I don't like the orange flavor)
    1/2 cup pecan halves

    Cinnamon-Cream Cheese Frosting
    8 oz pkg cream cheese, softened
    1/2 cup butter, softened
    l teaspoon cinnamon
    l teaspoon vanilla
    5 3/4 to 6 1/4 cups powdered sugar

    For Cake
    Preheat oven to 350.

    Peel and chop carrots, place in food processor/blender using several pulses (should have about 1 1/2 cups after shredding them).

    OR In a covered medium saucepan cook carrots in a moderate amount of boiling water about 20 minutes or until very tender. Drain. Cool carrots slightly; coarsely mash with a potato masher.

    Grease and lightly flour three 8 or 9 inch round cake pans. I prefer 8 inch. 

    In a large mixing bowl stir together flour, sugar, cinnamon, baking powder, baking soda, and salt. Make a well in the center and add oil, eggs, pineapple, and vanilla. Beat with an electric mixer on low speed with wire whisk attachment for 1 minute to combine all ingredients. Fold in the l cup pecans, the coconut, and shredded carrots.

    Spread batter evenly into prepared pans. Bake for 35 to 40 minutes or until toothpick inserted in center comes out clean. Cool for 10 minutes and remove from pans, Cool completely on wire racks.

    Praline Sauce
    In a small saucepan over medium heat, melt the brown sugar and cream and butter. Cook and stir until mixture comes to a boil. Reduce heat and boil gently over entire surface for 3 minutes, stirring occasionally. Stir in vanilla. Cool.

    Candied Pecan Halves
    Preheat oven to 350. Combine brown sugar and orange juice. Add pecan halves, stirring to coat. Spread in a lightly greased baking pan. Bake 12 mins or until nuts are browned & syrup is bubbly, stirring once. Pour out onto lightly greased baking sheet, separating into single nuts. Cool on wire rack.

    Assembling Cake
    Place 1 of the completely cooled cake layers, top down, on cake plate. Use about 1 cup frosting to pipe or spoon a rim about 1" & 1/2" high around outer edge of cake layer.

    Then spoon about 2 Tablespoons of frosting in center 1-1/2" of that layer, leaving an unfrosted area or ring. Spoon & spread half of the Praline Sauce into ring (sauce will not fill ring). Add 2nd cake layer, top down, & repeat frosting & sauce as above.

    Add final cake layer, top up. Frost top & sides of layer with remaining frosting. Garnish top with Candied Pecan Halves. Store cake in refrigerator.

    Friday, November 28, 2008

    ***Classic French Silk Pie***

    We have a new method for making this classic pie -cooking the eggs- which gives the filling a soft texture. Freezing the pie makes it easier to cut, yet still retains its rich flavor, smooth texture and great chocolate flavor.

    (Betty Crocker's Best of Baking)


    Pie crust, baked and cooled
    1/4 cup (1/2 stick) butter, softened
    3 ounces unsweetened chocolate
    1 cup sugar
    2 Tablespoons cornstarch
    3 eggs
    1 teaspoon vanilla
    1 cup chilled whipping (heavy) cream (1 pint is enough for the filling & topping)
    Whipped cream, if desired

    Prepare and bake pie shell; cool (preferably the day before). Combine butter and chocolate in 2 -quart saucepan over low heat until melted. Remove from heat. Mix sugar and cornstarch; stir into chocolate mixture. Meanwhile, beat eggs in small bowl on medium speed until thick and lemon colored; stir into chocolate mixture. Cook mixture over medium heat 5 minutes, stirring constantly, until thick and glossy; stir in vanilla. Cool 10 minutes, stirring occasionally.

    Beat whipping cream in chilled medium bowl until stiff. Fold chocolate mixture into whipped cream; pour into pie shell (the whipping cream will not fold very well into the warm chocolate, use a whisk to combine it better and it will be fine).

    Cover and freeze about 4 hours or until firm. Garnish with whipped cream and chocolate curls, if desired. Freeze or refrigerate any remaining pie.

    recipe for Sweetened Whipped Cream

    Chocolate curls:

    1/2 cup chocolate (any kind), (3 ounces)
    1/2 Tablespoon vegetable oil

    Combine chocolate and oil in saucepan over low heat until melted. Spread chocolate thinly on a cookie sheet and place in freezer about 5 minutes. Use a rubber spatula to push under chocolate and it should curl (if it breaks then put it in the freezer a few minutes longer). Go here for some picture demonstrations.

    Or I hear you can use a vegetable peeler on room temp. chocolate and it will curl nicely.

    Friday, October 24, 2008

    ***Seasoned Pork Loin***

    (AnnDee N. & Joy L.)


    2-3 pounds whole pork tenderloin (usually 2 pieces of meat in the package)
    1 teaspoon garlic powder
    1 teaspoon salt
    1 teaspoon pepper
    1/2 teaspoon paprika
    1/2 teaspoon marjoram

    Mix spices and rub on tenderloin. Cook at 325˚ for approximately 1 1/2 hours, meat temperature should be at 145-160 degrees when done. Pork can be slightly pink when done.

    Thursday, January 3, 2008

    ***Ratatouille***


    (from Smitten Kitchen blog)

    ½ onion, finely chopped
    2 garlic cloves, very thinly sliced
    1 can tomato sauce (15 ounces) (or puree such as Pomi)
    2 Tablespoons olive oil, divided
    1 small eggplant (Italian Eggplants are less than half the size of regular ones; it works perfectly)
    1 small zucchini (may need 2 if they are small)
    1 small yellow squash (may need 2 if they are small)
    2 longish red bell pepper
    Few sprigs fresh thyme (or dried ground thyme)
    Salt and pepper
    Few Tablespoons soft Goat Cheese (this makes the dish rich with a creamy taste)
    Brown rice or other grain
    Parchment paper

    Pour tomato puree into bottom of an oval baking dish, approximately 10 inches across the long way. Drop the sliced garlic cloves and chopped onion into the sauce, stir in one Tablespoon of the olive oil and season the sauce generously with salt and pepper. Trim the ends off the eggplant, zucchini and yellow squash. As carefully as you can, trim the ends off the red pepper and remove the core, leaving the edges intact, like a tube. On a mandoline, adjustable-blade slicer or with a very sharp knife, cut the eggplant, zucchini, yellow squash and red pepper into very thin slices, approximately 1/16-inch thick.

    Atop the tomato sauce, arrange slices of prepared vegetables concentrically from the outer edge to the inside of the baking dish, overlapping so just a smidgen of each flat surface is visible, alternating vegetables. You may have a handful leftover that do not fit. Drizzle the remaining Tablespoon olive oil over the vegetables and season them generously with salt and pepper. Remove the leaves from the thyme sprigs with your fingertips, running them down the stem. Sprinkle the fresh thyme over the dish. Or very lightly sprinkle some dried ground thyme (you can always add more later if needed).

    Cover dish with a piece of parchment paper cut to fit inside. Bake at 375˚ for approximately 45 to 55 minutes, until vegetables have released their liquid and are clearly cooked, but with some structure left so they are not totally limp. They should not be brown at the edges, and you should see that the tomato sauce is bubbling up around them. Serve with a dab of soft goat cheese on top (it will melt and add a creamy taste to the sauce), alone, or with some crusty French bread, atop polenta, couscous, brown rice or your choice of grain.


    recipe found here